これは TECHSCORE Advent Calendar 2017 の1日目の記事です。
SPA(SinglePageApplication)を作成する際には避けては通れないルーティング。
ReactではReact Routerを使うことで、簡単にルーティングを実現することができるのですが、画面遷移に使用するhistoryオブジェクトの使い方が初見では少し難しいように感じます。
ここでは、React Routerの実装を見ながら、historyオブジェクトについて探っていきます。
なお、現時点で最新のv4.2.2の実装を参照しています。
その前に
React Routerを使う場合、以下のように「BrowserRouterをRouterとしてimportする」ことが多いようです。React RouterのEXAMPLESでもそうなっています。
|
1 2 3 4 5 6 |
import { BrowserRouter as Router, ... } from 'react-router-dom'; const App = () => <Router> ... </Router>; |
一方、React Router内部でRouterという名称のコンポーネントが定義されており、以下の文章ではこのRouterに言及しています。以下のサンプルでは、BrowserRouterとRouterの区別が明確になるようにBrowserRouterをそのままimportしています。
|
1 2 3 4 5 6 |
import { BrowserRouter, ... } from 'react-router-dom'; const App = () => <BrowserRouter> ... </BrowserRouter>; |
基本的なhistoryの使い方
まずはじめに基本的な使い方を確認するため、historyを使った単純なアプリを作ってみます。動作するサンプルはこちら。
|
6 7 8 9 10 11 12 13 14 15 16 17 18 19 20 21 22 23 24 25 26 27 28 29 30 31 32 33 34 35 36 37 38 39 40 41 |
const App = () => <BrowserRouter> <div> <Route exact path="/" component={Home} /> <Route path="/foo" component={Foo} /> </div> </BrowserRouter>; const Home = () => <Link to="/foo">foo</Link>; const Foo = (props) => <div> <button onClick={() => props.history.goBack()}> Foo: back OK </button><br /> <Bar /><br /> <Baz history={props.history} /><br /> <Qux /><br /> </div>; const Bar = (props) => <button onClick={() => props.history.goBack()}> Bar: back NG </button>; const Baz = (props) => <button onClick={() => props.history.goBack()}> Baz: back OK </button>; const Qux = withRouter( (props) => <button onClick={() => props.history.goBack()}> Qux: back OK </button> ); |
最初の画面(<Home>)にはリンクが一つあり、そのリンクをクリックすると別の画面(<Foo>)に遷移します。<Foo>画面には「back」ボタンが4つあり、それぞれ history.goBack()で前の画面(<Home>)に戻るという想定です。
- <Route>のcomponent属性に指定したコンポーネント(<Foo>)では、propsからhistoryを取得して使用することができます。
- 一方、<Foo>の子要素である<Bar>ではpropsにhistoryは含まれていませんので、ボタンをクリックするとエラーになります。
- <Foo>の子要素でも、属性にhistoryを指定してprops経由で受け取れば、historyを使用することができます(<Baz>)。
- <Qux>のようにwithRouter()を使うことで、<Foo>の子要素でもhistoryを使用することができます。
historyはどこから来るのか
次にこのhistoryはどこで作られ、どのように<Foo>のpropsに渡されるのか、React Routerの実装を見ながら探っていきます。
まず<Route>の実装のうち、render()に注目します。
|
105 106 107 108 109 110 111 112 113 114 115 116 117 118 119 120 121 122 123 124 125 126 127 128 129 |
render() { const { match } = this.state const { children, component, render } = this.props const { history, route, staticContext } = this.context.router const location = this.props.location || route.location const props = { match, location, history, staticContext } return ( component ? ( // component prop gets first priority, only called if there's a match match ? React.createElement(component, props) : null ) : render ? ( // render prop is next, only called if there's a match match ? render(props) : null ) : children ? ( // children come last, always called typeof children === 'function' ? ( children(props) ) : !isEmptyChildren(children) ? ( React.Children.only(children) ) : ( null ) ) : ( null ) ) } |
114行目でcomponent属性に指定されたコンポーネントにpropsを渡しています。ここでhistoryが渡っているのでしょう。
108行目と110行目からは、contextから取り出したhistoryをpropsに設定しているのがわかります。
context
contextとはReactの機能で、propsのバケツリレーをせずにデータを下位のコンポーネントへと渡していく仕組みです。
Context
In some cases, you want to pass data through the component tree without having to pass the props down manually at every level. You can do this directly in React with the powerful "context" API.
By adding childContextTypes and getChildContext to MessageList (the context provider), React passes the information down automatically and any component in the subtree (in this case, Button) can access it by defining contextTypes.
上位のコンポーネントでchildContextTypesとgetChildContext()を定義し、下位のコンポーネントでcontextTypesを定義することで、contextを受け渡すことができます。
the powerful "context" API
強力なAPIなんですが、
Why Not To Use Context
If you want your application to be stable, don’t use context. It is an experimental API and it is likely to break in future releases of React.
「実験的で将来変わるかもしれないので、使わないほうがいいよ」とも書いてあります。
<Route>の実装の29〜35行目でcontextTypesを定義して、contextを受け取っています。
|
29 30 31 32 33 34 35 |
static contextTypes = { router: PropTypes.shape({ history: PropTypes.object.isRequired, route: PropTypes.object.isRequired, staticContext: PropTypes.object }) } |
さて、<Route>でcontextを受け取っているということは、上位のコンポーネントでcontextを設定しているはずです。前述のサンプルだと、<Route>の上位のコンポーネントは<BrowserRouter>しかありませんので、<BrowserRouter>の実装を見ていきます。
|
10 11 12 13 14 15 16 17 18 19 20 21 22 23 24 25 26 27 28 29 30 31 32 |
class BrowserRouter extends React.Component { static propTypes = { basename: PropTypes.string, forceRefresh: PropTypes.bool, getUserConfirmation: PropTypes.func, keyLength: PropTypes.number, children: PropTypes.node } history = createHistory(this.props) componentWillMount() { warning( !this.props.history, '<BrowserRouter> ignores the history prop. To use a custom history, ' + 'use `import { Router }` instead of `import { BrowserRouter as Router }`.' ) } render() { return <Router history={this.history} children={this.props.children}/> } } |
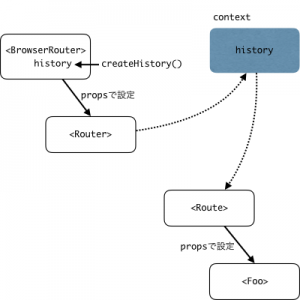
19行目でhistoryを作成して、
30行目で<Router>に渡しています。
<Router>の実装では、19〜34行目でhistoryを含んだオブジェクトをcontextに設定しています。
|
19 20 21 22 23 24 25 26 27 28 29 30 31 32 33 34 |
static childContextTypes = { router: PropTypes.object.isRequired } getChildContext() { return { router: { ...this.context.router, history: this.props.history, route: { location: this.props.history.location, match: this.state.match } } } } |
historyの生成、受け渡しの流れを図に表すとこんな感じでしょうか。contextを経由することで直接関係のないコンポーネントにhistoryを渡しています。

【非推奨】context経由でhistoryを受け取ったらいいのでは?
<BrowserRouter>で生成されたhistoryをcontext経由で<Router>に受け渡していることがわかりました。ということは、前述のサンプルでhistoryが使えなかった<Foo>の子要素でも、同じようにすればhistoryを使用することができるのではないでしょうか。簡単にできました。
以下の実装を前述のサンプルに追記しています。
49〜55行目にcontextを受け取る定義を記述しています。
44行目でcomponent functionの第2引数としてcontextを受け取り、
45行目でcontext.routerからhistoryを取り出しています。
|
44 45 46 47 48 49 50 51 52 53 54 55 |
const Quux = (props, context) => <button onClick={() => context.router.history.goBack()}> Quux: back OK </button>; Quux.contextTypes = { router: PropTypes.shape({ history: PropTypes.object.isRequired, route: PropTypes.object.isRequired, staticContext: PropTypes.object }) }; |
前述のサンプルでhistoryが使えなかった<Bar>(21行目)と同じ方法で、新しく作った<Quux>を配置しています(24行目)。
|
16 17 18 19 20 21 22 23 24 25 |
const Foo = (props) => <div> <button onClick={() => props.history.goBack()}> Foo: back OK </button><br /> <Bar /><br /> <Baz history={props.history} /><br /> <Qux /><br /> <Quux /><br /> </div>; |
ただし、前述のように
If you want your application to be stable, don’t use context. It is an experimental API and it is likely to break in future releases of React.
実験的な機能であるため、contextを直接使用することは推奨されていません。
withRouter()はどのように働くのか
withRouter()は直接contextを使わなくてもhistoryを受け取ることができる機能です。こちらも実装を見てみます。
|
9 10 11 12 13 14 15 16 17 18 19 20 21 22 23 24 25 26 |
const withRouter = (Component) => { const C = (props) => { const { wrappedComponentRef, ...remainingProps } = props return ( <Route render={routeComponentProps => ( <Component {...remainingProps} {...routeComponentProps} ref={wrappedComponentRef}/> )}/> ) } C.displayName = `withRouter(${Component.displayName || Component.name})` C.WrappedComponent = Component C.propTypes = { wrappedComponentRef: PropTypes.func } return hoistStatics(C, Component) } |
25行目で実行しているhoistStatics()で、Componentに定義されている静的関数をCに複製して、Cを返しています。(hoistStatics()の実装はこちら。解説はこちら。)
10行目以降でCを定義しています。13〜15行目を簡単に書くと以下のようになり、<Route>の配下にComponentを置くことでhistoryを使えるようにしています。
|
1 |
<Route render={() => <Component/>}/> |
まとめ
React Routerのhistoryの生成と受け渡し方法について、実装を見ながら探りました。
- historyは<BrowserRouter>で生成されている。
- historyの受け渡しはcontextを経由して行われる。(<Router>⇒<Route>)
- context APIは直接使用してはいけない。
- withRouter()では<Route>の配下にコンポーネントが配置されるので、historyが使用できるようになる。<Route>の配下に置かれるならwithRoute()じゃないのか?
- 案外、Reactの公式ドキュメントにしっかり書いてある。
Enjoy your React life!

