-
Just to clarify, I will be referring to the following terms as below:
- Angular 1 as AngularJS
- Angular 2 as Angular
Google released the first stable version of Angular by the end of 2016 and since Angular has been completely rewritten and is not an upgrade of AngularJS, it is a big break change for companies that already have quite robust system built in AngularJS in their frontend.
Having said that, I decided to write and explain step by step how to utilize UpgradeModule library from Angular and have an AngularJS application that allows Angular components within in its application, and not only that but also by utilizing it, it is also possible achieve communication between AngularJS controllers and Angular services and vice versa.
Setting the environment in Plunker
For demonstration purposes, I will be using Plunker. I will also explain step by step how to set the correct hybrid environment in Plunker as well.
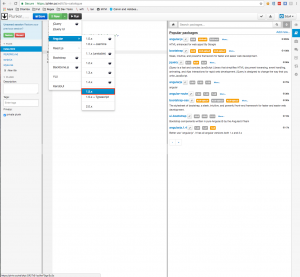
From here click on the new dropdown button and select “Angular 1.5”, exclude the “Angular 1.5 + Typescript” option because in future articles I want to show how AngularJS controllers, directives, services completely written in Javascript communicate with Angular components.
Mapping core Angular libraries
Then, from the menu on the left, create a new file named "config.js". That file will utilize a module loader, which will be mapping and telling Angular where to look when a library is being invoked.
This file will be utilizing SystemJS, but there are some other options such as Webpack and Browserify.
After creating the file, we just can copy and paste the following code that includes the libraries we will be utilizing this time.
config.js
|
1 2 3 4 5 6 7 8 9 10 11 12 13 14 15 16 17 18 19 20 21 22 23 24 25 26 27 28 29 30 31 32 33 34 35 36 37 38 39 40 41 42 43 44 45 46 47 48 49 50 51 52 |
System.config({ //use typescript for compilation transpiler: 'typescript', //typescript compiler options typescriptOptions: { emitDecoratorMetadata: true }, paths: { 'npm:': 'https://unpkg.com/' }, //map tells the System loader where to look for things map: { 'app': './src', '@angular/core': 'npm:@angular/core/bundles/core.umd.js', '@angular/common': 'npm:@angular/common/bundles/common.umd.js', '@angular/compiler': 'npm:@angular/compiler/bundles/compiler.umd.js', '@angular/platform-browser': 'npm:@angular/platform-browser/bundles/platform-browser.umd.js', '@angular/platform-browser-dynamic': 'npm:@angular/platform-browser-dynamic/bundles/platform-browser-dynamic.umd.js', '@angular/http': 'npm:@angular/http/bundles/http.umd.js', '@angular/router': 'npm:@angular/router/bundles/router.umd.js', '@angular/forms': 'npm:@angular/forms/bundles/forms.umd.js', '@angular/core/testing': 'npm:@angular/core/bundles/core-testing.umd.js', '@angular/common/testing': 'npm:@angular/common/bundles/common-testing.umd.js', '@angular/compiler/testing': 'npm:@angular/compiler/bundles/compiler-testing.umd.js', '@angular/platform-browser/testing': 'npm:@angular/platform-browser/bundles/platform-browser-testing.umd.js', '@angular/platform-browser-dynamic/testing': 'npm:@angular/platform-browser-dynamic/bundles/platform-browser-dynamic-testing.umd.js', '@angular/http/testing': 'npm:@angular/http/bundles/http-testing.umd.js', '@angular/router/testing': 'npm:@angular/router/bundles/router-testing.umd.js', '@angular/upgrade': 'npm:@angular/upgrade/bundles/upgrade.umd.js', '@angular/upgrade/static': 'npm:@angular/upgrade/bundles/upgrade-static.umd.js', 'rxjs': 'npm:rxjs', }, //packages defines our app package packages: { //this file will be used for bootstrapping our application. app: { main: './main.ts', defaultExtension: 'ts' }, app_component_ts: { // this will our future file where we will create our Angular component. main: './my-university.ts', defaultExtension: 'ts' }, rxjs: { defaultExtension: 'js' } } }); |
Adding core libraries to index.html
Then we have to prepare the index.html so that it loads the config.js we just created and some core libraries needed (zonejs, reflectjs, systemjs) by Angular. Also we need to delete the AngularJS code created by plunker so that it does not bootstrap.
Later on after editing the AngularJS controller created by Plunker(app.js) and creating a new Angular component, we will return to this file to call both components (AngularJS and Angular) from here.
After editing index.html, it should look something similar as below.
index.html
|
1 2 3 4 5 6 7 8 9 10 11 12 13 14 15 16 17 18 19 20 21 22 23 24 25 26 27 28 |
<html> <head> <meta charset="utf-8" /> <title>AngularJS Plunker</title> <script data-require="[email protected]" src="https://cdnjs.cloudflare.com/ajax/libs/angular.js/1.5.10/angular.min.js" data-semver="1.5.10"></script> <script src="https://unpkg.com/zone.js/dist/zone.js"></script> <script src="https://unpkg.com/zone.js/dist/long-stack-trace-zone.js"></script> <script src="config.js"></script> <script src="app.js"></script> <script> System.import('app') .catch(console.error.bind(console)); </script> </head> <body> </body> </html> |
Creating an Angular component
Next we create the sample Angular component that we want to display later display it in our app. This time I am calling it src/my-uniservity.ts (note the file's path), this file is also mapped in the previously created "config.js" file.
Inside we will assign a moduleID, selector and template. The component, my-university, will be called by using its selector as html tag in the template. Lastly, we will export its class so that other classes can access it.
src/my-university.ts
|
1 2 3 4 5 6 7 8 |
import { Component } from '@angular/core'; @Component({ moduleId: __moduleName, selector: 'my-university', template: ` <h1>{{title}}</h1> `, }) export class AppComponent { title = 'Tokyo University'; } |
Creating and organizing NgModule
Next we create "src/app.module.ts", which includes NgModule. This last one, will help us to organize the entire application into blocks. It receives a metadata object then Angular interprets it and compiles our components.
This file also will be importing UpgradeModule that will help us to prevent Angular from bootstrapping utilizing the ngDoBootstrap method.
Note that this file will be also importing the previously created "src/my-university.ts" file
src/app.module.ts
|
1 2 3 4 5 6 7 8 9 10 11 12 13 14 15 16 17 18 19 |
import { NgModule } from '@angular/core'; import { UpgradeModule } from '@angular/upgrade/static'; import { BrowserModule } from '@angular/platform-browser'; import { FormsModule } from '@angular/forms'; import { RouterModule } from '@angular/router'; import { AppComponent } from './my-university.ts'; @NgModule({ imports: [ UpgradeModule, BrowserModule, FormsModule ], declarations: [ AppComponent ], bootstrap: [ AppComponent ] }) export class AppModule { } |
Implementing UpgradeModule
Then we create another file called "src/main.ts" which it is the one that will invoke the UpgradeModule class and bootstrap our application. It should look as below.
src/main.ts
|
1 2 3 4 5 6 7 8 9 10 11 12 |
import { platformBrowserDynamic } from '@angular/platform-browser-dynamic'; import { UpgradeModule } from '@angular/upgrade/static'; import { AppModule } from './app.module'; declare var angular: any; platformBrowserDynamic().bootstrapModule(AppModule).then(platformRef => { const upgrade = platformRef.injector.get(UpgradeModule) as UpgradeModule; upgrade.bootstrap(document.body, ['my-app'], {strictDi: true}); }); |
Creating an AngularJS controller
Now we delete all the source code created by plunker in the file "app.js", rename it to "university-controller.js" and create a new Controller inside of it. This controller be called from index.html
university-controller.js
|
1 2 3 4 |
angular.module('my-app', []) .controller('UniversityController', ['$scope', function ($scope) { $scope.universityName = 'UBC University'; }]); |
Invoking both, an Angular component and an AngularJS controller
Finally we return to the "index.html" file and make it call our AngularJS controller and Angular component by using their selectors inside the body tags.
index.html
|
1 2 3 4 5 6 7 8 9 10 11 12 13 14 15 16 17 18 19 20 21 22 23 24 25 26 27 28 29 30 31 |
<html> <head> <meta charset="utf-8" /> <title>AngularJS Plunker</title> <script data-require="[email protected]" src="https://cdnjs.cloudflare.com/ajax/libs/angular.js/1.5.10/angular.min.js" data-semver="1.5.10"></script> <script src="https://unpkg.com/zone.js/dist/zone.js"></script> <script src="https://unpkg.com/zone.js/dist/long-stack-trace-zone.js"></script> <script src="config.js"></script> <script src="university-controller.js"></script> <script> System.import('app') .catch(console.error.bind(console)); </script> </head> <body> <h1 ng-controller="UniversityController"> {{universityName}} </h1> <my-university>Loading...</my-university> </body> </html> |
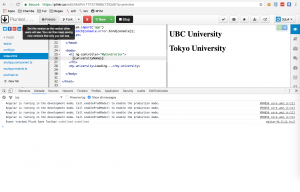
The screen in Plunker should look as below.
Here is a direct link to the plunker sample.
In future articles I will demonstrate how to achieve communication between AngularJS services with Angular components and vice versa.


