こんにちは、白川です。
これはTECHSCORE Advent Calendar 2016の21日目の記事です。
今回はOpenAMを使ったシングルサインオン(以下SSO)について紹介します。
OpenAMについて
OpenAMの概要
WebアプリケーションにおけるSSOを
実現するためのプラットフォームとなるオープンソースのソフトウェアです。
SAML、OAuth2、OpenID Connect、など認証、認可に関連した複数のプロトコルをサポートしています。
SSOの実現方式
■ エージェント方式
SSO対象のWebサーバ/アプリケーションサーバにOpenAMのPolicy Agentをインストールして、Policy AgentがブラウザとWebサーバ/アプリケーションサーバの通信の中で、OpenAMサーバに認証状態を確認することでSSOを実現します。
Policy AgentはWebサーバ(Apache、IIS)用と、Java EEアプリケーションサーバ(Tomcat、WebLogic)用があります。
■ リバースプロキシ方式
ブラウザとWebサーバ/アプリケーションサーバの間にリバースプロキシサーバを設置して、リバースプロキシサーバにPolicy Agentをインストールすることで、SSOを実現します。
この方式ではリバースプロキシサーバにのみPolicy Agentをインストールするのみで済みますので、複数のSSO対象のWebサーバ/アプリケーションサーバが存在する場合、展開しやすいです。
■ 代理認証方式
SSO対象アプリケーションのログインページに対して、IDとパスワードを送信し、ログインすることで、SSOを実現します。
パッケージソフトを利用している場合など、SSOを実現するための修正対応が難しい場合に使われます。
また、この方式では、SSO対象アプリケーションのID/パスワードを何らかの方式で同期させておく必要があります。
■ フェデレーション方式
異なるドメイン間で、パスワード等の情報を渡すことなく、安全に認証されたユーザーの情報を連携することで、シングルサインオン(SSO)を実現します。
今回はリバースプロキシ方式のSSOをOpenAMで実現するフローについて紹介します。
下記が今回紹介するフローの概要図です。
- ユーザがOpenAMで認証されていない状態で、リバースプロキシ経由でSSO対象のアプリケーションにアクセスします。
- OpenAMのPolicy Agent(リクエストを監視するソフトウェア)によって、認証されていないと判断し、OpenAMのログインページにリダイレクトします。
- ユーザは正しいIDとパスワードを入力して、ログインします。
- OpenAMによって認証され、ユーザ情報をHTTPヘッダにセットして、SSO対象アプリケーションにリダイレクトします。
環境
以下、実際に試してみた際のバージョン情報です。
■ OpenAMサーバ
・OS:CentOS 7.2
・Apache HTTP Server:2.4.6
・Tomcat:7.0.73
・Java:openjdk-1.8.0.111
・OpenAM:13.0.0
■ SSO対象アプリケーションサーバ
・OS:CentOS 7.2
・Apache HTTP Server:2.4.6
・PHP: 5.4.16
・OpenAM Web Policy Agent: 4.0.0 for Apache 2.4
OpenAMサーバのセットアップ
それでは、OpenAMサーバのセットアップから始めます。
下記の手順は全てrootユーザで実施します。
OpenAMをセットアップする際、OpenAMサーバのホスト名をFQDNで名前解決できるようにしておく必要があります。
また.(ドット)が2つ以上あるFQDNとしてください。
今回は、OpenAMサーバのFQDNを「openam-test.example.com」とします。
/etc/hostsで名前解決するために以下を追記します。
|
1 |
[OpenAMサーバのIPアドレス] openam-test.example.com |
/etc/hostnameを以下のように変更します。
|
1 |
openam-test.example.com |
1. Java、Tomcatのインストール
Javaのインストールを行います。
|
1 2 3 4 5 6 |
$ sudo su - # yum install java-1.8.0-openjdk java-1.8.0-openjdk-devel java -version openjdk version "1.8.0_111" OpenJDK Runtime Environment (build 1.8.0_111-b15) OpenJDK 64-Bit Server VM (build 25.111-b15, mixed mode) |
次にTomcatのインストールを行います。
|
1 2 3 |
# wget http://ftp.riken.jp/net/apache/tomcat/tomcat-7/v7.0.73/bin/apache-tomcat-7.0.73.tar.gz # tar xvzf apache-tomcat-7.0.73.tar.gz # mv apache-tomcat-7.0.73 /usr/local/tomcat |
インストールが完了したら、環境変数JAVA_HOMEとJAVA_OPTSがセットされるように、/etc/profileに追記します。
OpenAMの起動には、1GBのJavaヒープと256MBのPermanent領域(Java8からはMetaspace領域)が必要です。
追記する内容は下記の通りです。
|
1 2 3 4 5 6 |
export JAVA_HOME=/usr/lib/jvm/java-1.8.0-openjdk-1.8.0.111-2.b15.el7_3.x86_64 export PATH=$PATH:$JAVA_HOME/bin export JAVA_OPTS="-Xmx1024m -XX:MaxMetaspaceSize=256m" export TOMCAT_HOME=/usr/local/tomcat export CATALINA_HOME=/usr/local/tomcat export CLASSPATH=.:$JAVA_HOME/jre/lib:$JAVA_HOME/lib:$JAVA_HOME/lib/tools.jar:$CATALINA_HOME/lib |
※ JAVA_HOME は bin/java 実行可能ファイルを含むディレクトリーを参照する必要があります。
不明な場合は下記コマンドで確認できます。
|
1 2 |
# readlink -f /usr/bin/javac | sed s:/bin/javac:: /usr/lib/jvm/java-1.8.0-openjdk-1.8.0.111-2.b15.el7_3.x86_64 |
/etc/profileに追記した内容を反映させます。
|
1 |
# source /etc/profile |
Tomcatが起動することを確認します。
|
1 |
# /usr/local/tomcat/bin/startup.sh |
http://openam-test.example.com:8080に
ブラウザからアクセスしてTomcatのTop画面が表示されればここまではOKです。
※ アクセスする端末のhostsファイルにも以下を設定しておいてください。
|
1 |
[OpenAMサーバのIPアドレス] 192.168.56.80 |
2. OpenAMのインストール
こちらからダウンロードします。
ダウンロードするためには、forgerock社へのアカウント登録・サインインが必要です。
また、OpenAMのライセンスはCDDLとしてソースコードが公開されていますが、
いつからそうなったかは不明ですが、メジャーバージョンのみ無償でダウンロード可能となったようです。
マイナーバージョンのダウンロードはサブスクリプションの購入が必要です。
今回はOpenAM-13.0.0.zipをダウンロードしました。
ダウンロードしたzipファイルを解凍した中に、
OpenAM-13.0.0.warがありますので、
Tomcatのwebappsフォルダにコピーして、Tomcatを再起動してください。
|
1 |
cp OpenAM-13.0.0.war /usr/local/tomcat/webapps/login.war |
3. OpenAMの初期セットアップ
http://openam-example.com:8080/loginに
ブラウザからアクセスして初期セットアップを行います。
アクセスすると下記の画面が現れます。

ここでは必ず「カスタム設定」を選択してください。
「デフォルト設定」には不具合があり、後に問題が起きる可能性があるためです。
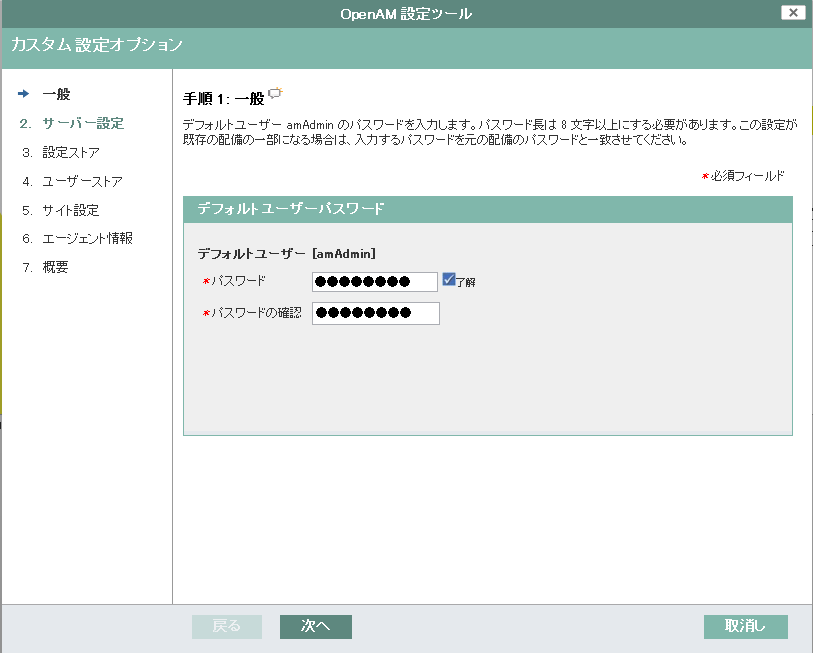
ライセンスに同意した後に、amAdminユーザのパスワードを設定する画面が表示されます。
amAdminユーザはopenamの管理者権限を持つユーザでパスワードを忘れてしまうと、openamの一切の設定ができなくなってしまうため、忘れないように注意が必要です。
ここではopenam01としました。
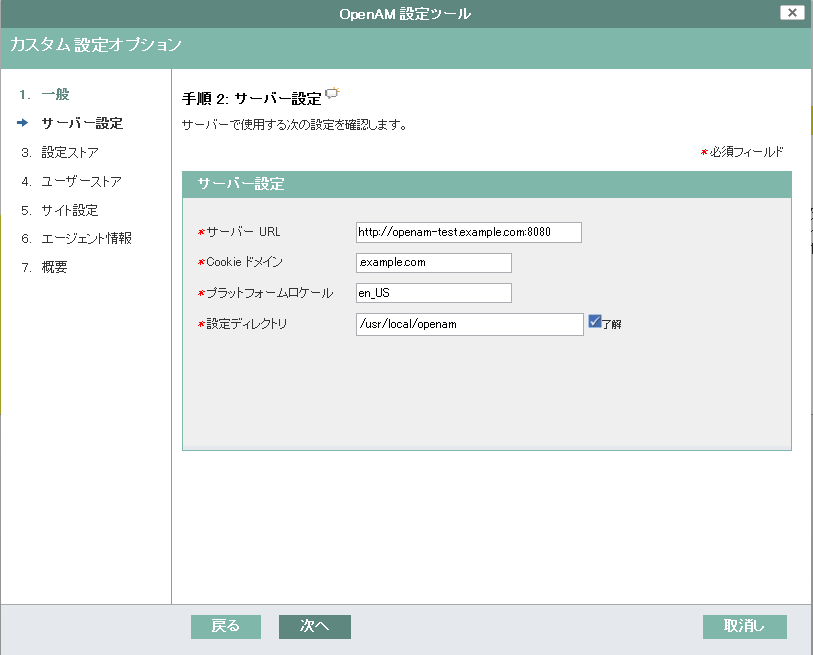
次に「サーバー設定」画面に遷移します。
ここでは、設定ディレクトリのみ「/usr/local/openam」としました。
その他はデフォルトで設定される内容のまま次に進みます。
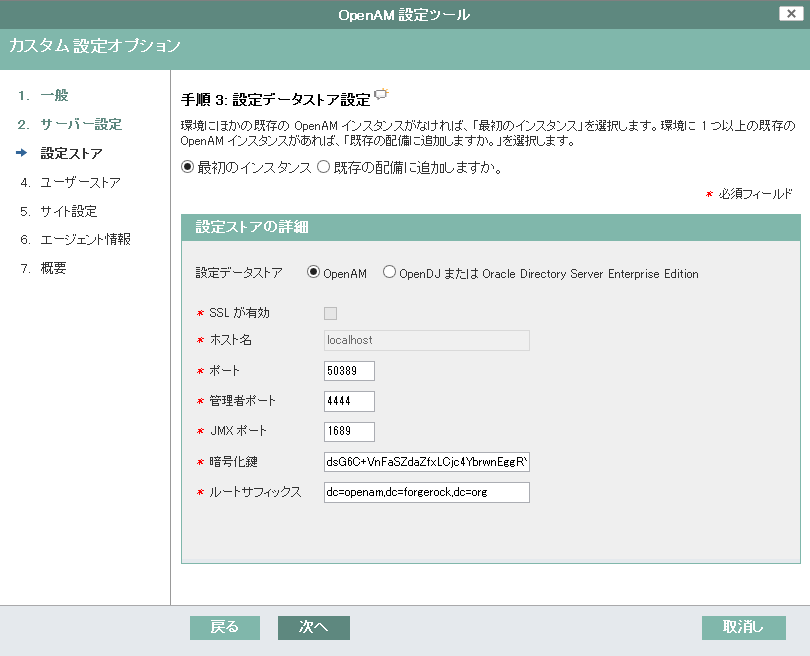
次に「設定データストア」画面に遷移します。
ここは「OpenAM」が初期で選択されており、設定内容は変更せずに次に進みます。
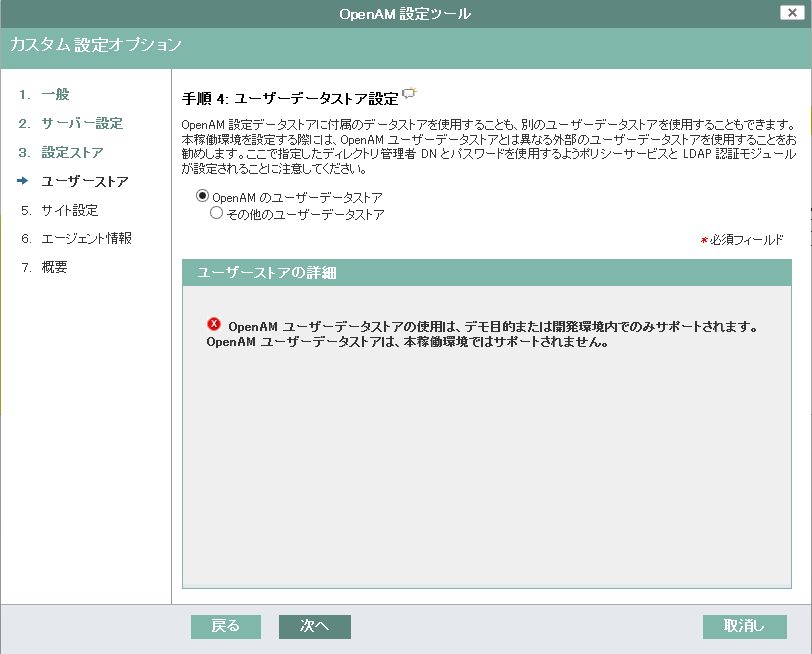
次に「ユーザデータストア」画面に遷移します。
ここは「OpenAMのユーザストア」を選択して、次に進みます。
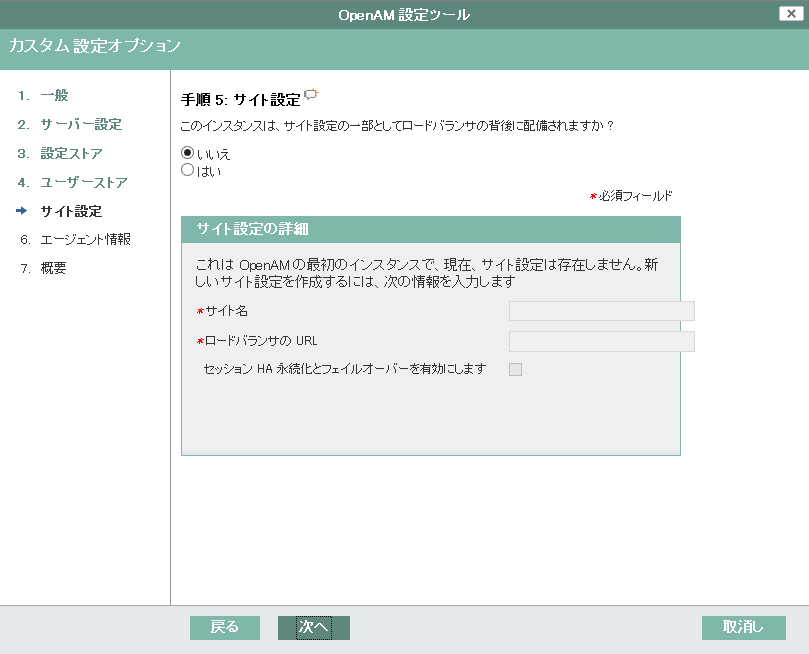
次に「サイト設定」画面に遷移します。
ロードバランサの下に配置されるOpenAMサーバかどうかを問われます。
OpenAMを冗長化する場合にYESにするようですが、今回はNOで次に進みます。
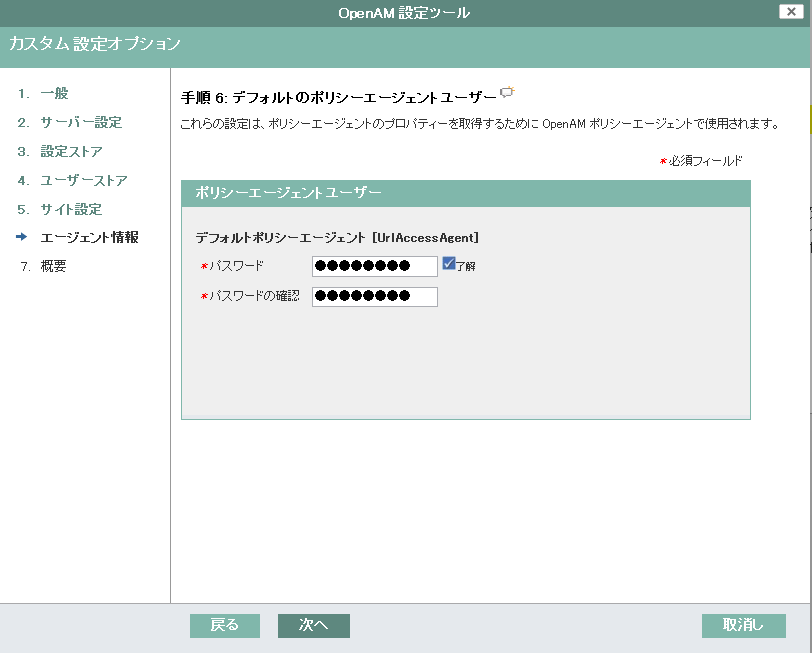
次にPolicy Agentで使用するパスワードを設定します。
後の手順で必要となりますので、忘れないように注意が必要です。ここではopenam02としました。
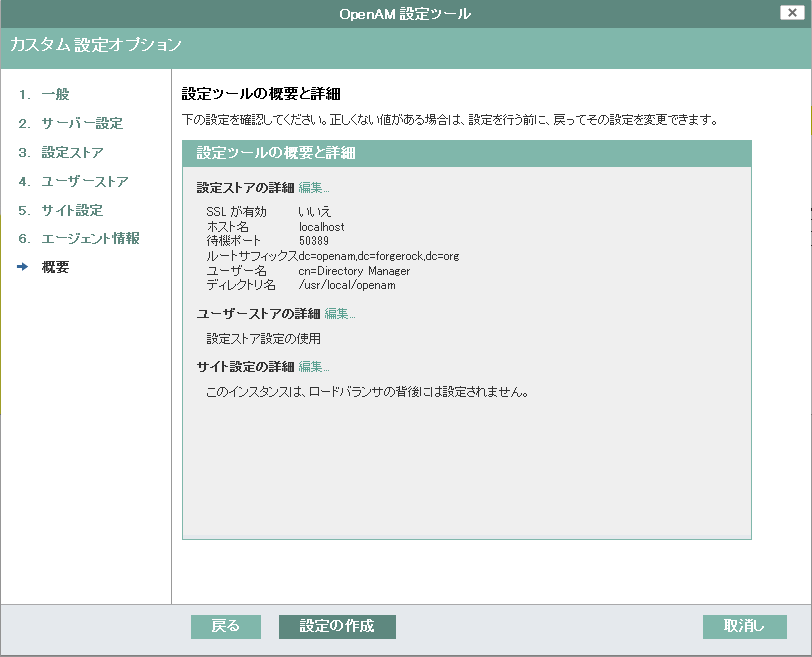
最終確認画面が表示されますので、
「設定の作成」ボタンをクリックします。
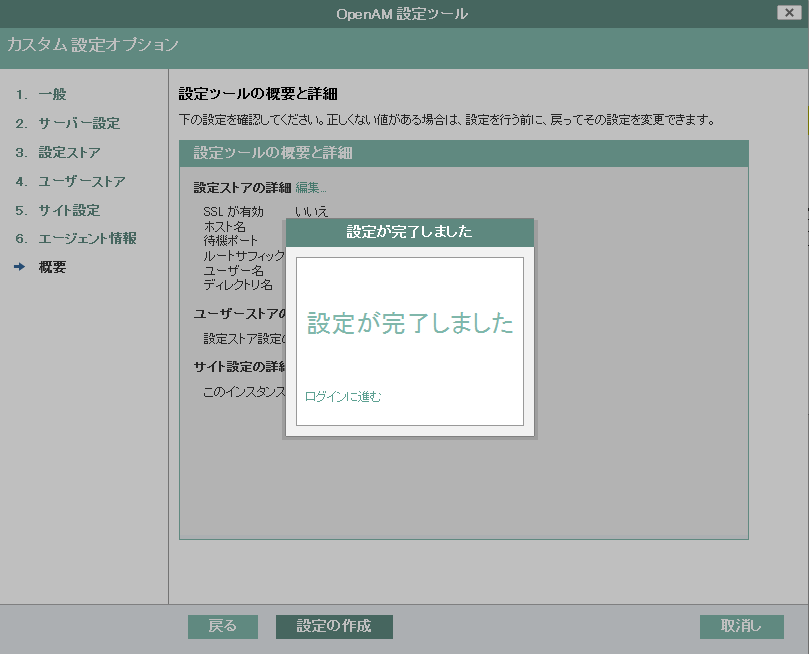
もしここで失敗した場合は、OpenAMの設定ディレクトリ(今回では/usr/local/openam)直下にあるinstall.logに、
エラー内容が出力されています。
エラー内容確認の上、再度初期設定から行う場合は、OpenPMの設定ディレクトリ、Tomcatの配備ディレクトリを削除して、
Tomcatを再起動します。
|
1 2 3 4 |
/usr/local/tomcat/bin/shutdown.sh rm -Rf /usr/local/openam rm -Rf /usr/local/tomcat/webapps/login /usr/local/tomcat/bin/startup.sh |
4. 独自認証モジュール作成
OpenAMでは標準でActive DirectoryやLDAP、JDBCなど様々なログイン認証のモジュールが用意されていますが、
独自の認証モジュールを作成することが可能です。
OpenAMのDevelopers Guideに方法が記載されていますので、
こちらを参考に作成してみます。
今回は以下の仕様で認証モジュールを作成します。
- sampleというrealm(レルムと言います。OpenAMで一連の設定を管理する単位のこと)で使用する
- ログイン可能となる固定のユーザ名とパスワードをOpenAMの管理画面で設定可能とする
- 認証OKであれば、セッションにユーザ情報をセットする
認証モジュールは下記のディレクトリ構成で作成します。
★をつけたものを用意していきます。
|
1 2 3 4 5 6 7 8 9 10 11 12 13 14 15 16 17 18 19 20 |
├── pom.xml ★ └── src └── main ├── java │ └── com │ └── example │ └── openam │ ├── SampleAuth.java ★ │ └── SampleAuthPrincipal.java ★ └── resources ├── amAuthSampleAuth.properties ★ ├── amAuthSampleAuth.xml ★ └── config └── auth └── default └── login └── services └── sample └── html └── SampleAuth.xml★ |
4-1. pom.xmlの準備
以下の内容で作成します。
|
1 2 3 4 5 6 7 8 9 10 11 12 13 14 15 16 17 18 19 20 21 22 23 24 25 26 27 28 29 30 31 32 33 34 35 36 37 38 39 40 41 42 43 44 45 46 47 48 49 50 51 52 53 54 55 56 57 58 59 60 |
<?xml version="1.0" encoding="UTF-8"?> <project xmlns="http://maven.apache.org/POM/4.0.0" xmlns:xsi="http://www.w3.org/2001/XMLSchema-instance" xsi:schemaLocation="http://maven.apache.org/POM/4.0.0 http://maven.apache.org/xsd/maven-4.0.0.xsd"> <modelVersion>4.0.0</modelVersion> <groupId>com.example.openam</groupId> <artifactId>sample-auth-module</artifactId> <version>1.0.0</version> <packaging>jar</packaging> <properties> <openam.version>13.0.0</openam.version> <project.build.sourceEncoding>UTF-8</project.build.sourceEncoding> </properties> <repositories> <repository> <id>forgerock-releases</id> <url>http://maven.forgerock.org/repo/releases</url> </repository> <repository> <id>forgerock-snapshots</id> <url>http://maven.forgerock.org/repo/openam-snapshots</url> </repository> </repositories> <dependencies> <dependency> <groupId>org.forgerock.openam</groupId> <artifactId>openam-core</artifactId> <version>${openam.version}</version> </dependency> <dependency> <groupId>org.forgerock.openam</groupId> <artifactId>openam-shared</artifactId> <version>${openam.version}</version> </dependency> <dependency> <groupId>javax.servlet</groupId> <artifactId>servlet-api</artifactId> <version>2.5</version> <scope>provided</scope> </dependency> </dependencies> <build> <plugins> <plugin> <groupId>org.apache.maven.plugins</groupId> <artifactId>maven-compiler-plugin</artifactId> <version>3.3</version> <configuration> <source>1.8</source> <target>1.8</target> </configuration> </plugin> </plugins> </build> </project> |
4-2. src/main/java/org/forgerock/openam/examples/SampleAuth.java
com.sun.identity.authentication.spi.AMLoginModuleを継承したクラスを作成します。
processというメソッドのcase文のSTATE_AUTHの部分にログインボタン押下時のロジックを記述します。
今回は、こちらを参考に、以下の内容で作成しました。
|
1 2 3 4 5 6 7 8 9 10 11 12 13 14 15 16 17 18 19 20 21 22 23 24 25 26 27 28 29 30 31 32 33 34 35 36 37 38 39 40 41 42 43 44 45 46 47 48 49 50 51 52 53 54 55 56 57 58 59 60 61 62 63 64 65 66 67 68 69 70 71 72 73 74 75 76 77 78 79 80 81 82 83 84 85 86 87 88 89 90 91 92 93 94 95 96 97 98 99 100 101 102 103 104 105 106 107 108 109 110 111 112 113 114 115 116 117 118 119 120 121 122 123 124 125 126 127 128 129 130 131 132 133 134 135 136 137 138 139 140 141 142 143 144 145 146 147 148 149 150 151 152 153 154 155 156 157 |
package com.example.openam; import java.security.Principal; import java.util.Map; import java.util.ResourceBundle; import javax.security.auth.Subject; import javax.security.auth.callback.Callback; import javax.security.auth.callback.NameCallback; import javax.security.auth.callback.PasswordCallback; import javax.security.auth.login.LoginException; import com.sun.identity.authentication.spi.AMLoginModule; import com.sun.identity.authentication.spi.AuthLoginException; import com.sun.identity.authentication.util.ISAuthConstants; import com.sun.identity.shared.datastruct.CollectionHelper; import com.sun.identity.shared.debug.Debug; /** * SampleAuth authentication module example. * * If you create your own module based on this example, you must modify all * occurrences of "SampleAuth" in addition to changing the name of the class. * * Please refer to OpenAM documentation for further information. * * Feel free to look at the code for authentication modules delivered with * OpenAM, as they implement this same API. */ public class SampleAuth extends AMLoginModule { // Name for the debug-log private final static String DEBUG_NAME = "SampleAuth"; private final static Debug debug = Debug.getInstance(DEBUG_NAME); // Name of the resource bundle private final static String amAuthSampleAuth = "amAuthSampleAuth"; // User names for authentication logic private static String USERNAME; private static String PASSWORD; // Orders defined in the callbacks file private final static int STATE_BEGIN = 1; private final static int STATE_AUTH = 2; private final static int STATE_ERROR = 3; // Errors properties private final static String SAMPLE_AUTH_ERROR_REQUIRED_USERNAME = "sampleauth-error-required-username"; private final static String SAMPLE_AUTH_ERROR_REQUIRED_PASSWORD = "sampleauth-error-required-password"; private final static String SAMPLE_AUTH_ERROR_INVALID_USERNAME_OR_PASSWORD = "sampleauth-error-invalid-username-or-password"; private Map<String, String> options; private ResourceBundle bundle; private Map<String, String> sharedState; public SampleAuth() { super(); } /** * This method stores service attributes and localized properties for later * use. * @param subject * @param sharedState * @param options */ @Override public void init(Subject subject, Map sharedState, Map options) { debug.message("SampleAuth::init"); this.options = options; this.sharedState = sharedState; this.bundle = amCache.getResBundle(amAuthSampleAuth, getLoginLocale()); // OpenAMの管理画面で設定したユーザ名とパスワードを取得 USERNAME = CollectionHelper.getMapAttr(options,"sampleauth-service-valid-username"); PASSWORD = CollectionHelper.getMapAttr(options,"sampleauth-service-valid-password"); } @Override public int process(Callback[] callbacks, int state) throws LoginException { debug.message("SampleAuth::process state: {}", state); switch (state) { case STATE_BEGIN: substituteUIStrings(); return STATE_AUTH; case STATE_AUTH: // 画面で入力されたユーザ名とパスワードを取得 NameCallback nc = (NameCallback) callbacks[0]; PasswordCallback pc = (PasswordCallback) callbacks[1]; String username = nc.getName(); String password = String.valueOf(pc.getPassword()); if (username == null || "".equals(username)) { setErrorText(SAMPLE_AUTH_ERROR_REQUIRED_USERNAME); return STATE_ERROR; } if (password == null || "".equals(password)) { setErrorText(SAMPLE_AUTH_ERROR_REQUIRED_PASSWORD); return STATE_ERROR; } if (!USERNAME.equals(username) || !PASSWORD.equals(password)) { setErrorText(SAMPLE_AUTH_ERROR_INVALID_USERNAME_OR_PASSWORD); return STATE_ERROR; } // セッションにユーザ情報をセット // SSO対象のアプリにアクセスの際、Policy AgentがHTTPヘッダに下記情報をセットする setUserSessionProperty("sample-username", username); setUserSessionProperty("sample-organization", "Synergy Marcketing"); return ISAuthConstants.LOGIN_SUCCEED; case STATE_ERROR: return STATE_ERROR; default: throw new AuthLoginException("invalid state"); } } @Override public Principal getPrincipal() { return new SampleAuthPrincipal(USERNAME); } private void setErrorText(String err) throws AuthLoginException { // Receive correct string from properties and substitute the // header in callbacks order 3. substituteHeader(STATE_ERROR, bundle.getString(err)); } /** * ログイン画面のUI文字列差替え */ private void substituteUIStrings() throws AuthLoginException { // Get service specific attribute configured in OpenAM String ssa = CollectionHelper.getMapAttr(options, "specificAttribute"); // Get property from bundle String newHeader = ssa + " " + bundle.getString("sampleauth-ui-login-header"); substituteHeader(STATE_AUTH, newHeader); replaceCallback(STATE_AUTH, 0, new NameCallback( bundle.getString("sampleauth-ui-username-prompt"))); replaceCallback(STATE_AUTH, 1, new PasswordCallback( bundle.getString("sampleauth-ui-password-prompt"), false)); } } |
4-3. src/main/java/org/forgerock/openam/examples/SampleAuthPrincipal.java
java.security.Principalを実装したクラスです。
ここではこちらの内容をそのまま利用します。(内容は割愛します。)
4-4. src/main/resources/amAuthSampleAuth.properties
ログイン画面で差し替えに必要となる文字列などを定義したプロパティファイルです。
こちらを参考に以下のように作成しました。
※ native2asciiでUnicodeに変換する前の内容です。
|
1 2 3 4 5 6 7 8 9 10 11 12 |
sampleauth-service-description=サンプル認証モジュール a500=認証レベル a501=Service Specific Attribute a502=ログインユーザ名 a503=ログインパスワード sampleauth-ui-login-header=サンプルログイン画面 sampleauth-ui-username-prompt=ユーザ名: sampleauth-ui-password-prompt=パスワード: sampleauth-error-required-username=ユーザ名を入力してください。 sampleauth-error-required-password=パスワードを入力してください。 sampleauth-error-invalid-username-or-password=ユーザ名またはパスワードが違います。 |
4-5. src/main/resources/amAuthSampleAuth.xml
作成する認証モジュールをOpenAMにサービスとして読み込ませるための設定ファイルです。
サービス名はiPlanetAMAuth か sunAMAuth で開始する必要があります。
AttributeSchemaでOpenAMの管理画面で認証モジュールが使う設定内容を定義します。
こちらを参考に以下の内容で作成しました。
|
1 2 3 4 5 6 7 8 9 10 11 12 13 14 15 16 17 18 19 20 21 22 23 24 25 26 27 28 29 30 31 32 33 34 35 36 37 38 39 40 41 42 43 44 45 46 47 48 49 50 51 52 53 54 55 56 57 58 59 60 61 62 63 64 65 66 67 68 69 70 71 72 73 74 75 76 77 78 79 80 |
<?xml version="1.0" encoding="UTF-8"?> <!-- DO NOT ALTER OR REMOVE COPYRIGHT NOTICES OR THIS HEADER. Copyright (c) 2011-2015 ForgeRock AS. The contents of this file are subject to the terms of the Common Development and Distribution License (the License). You may not use this file except in compliance with the License. You can obtain a copy of the License at legal/CDDLv1.0.txt. See the License for the specific language governing permission and limitations under the License. When distributing Covered Code, include this CDDL Header Notice in each file and include the License file at legal/CDDLv1.0.txt. If applicable, add the following below the CDDL Header, with the fields enclosed by brackets [] replaced by your own identifying information: "Portions Copyrighted [year] [name of copyright owner]" --> <!DOCTYPE ServicesConfiguration PUBLIC "=//iPlanet//Service Management Services (SMS) 1.0 DTD//EN" "jar://com/sun/identity/sm/sms.dtd"> <ServicesConfiguration> <Service name="iPlanetAMAuthSampleAuthService" version="1.0"> <Schema serviceHierarchy="/DSAMEConfig/authentication/iPlanetAMAuthSampleAuthService" i18nFileName="amAuthSampleAuth" revisionNumber="10" i18nKey="sampleauth-service-description" resourceName="sample"> <Organization> <!-- Specify resourceName for a JSON-friendly property in the REST SMS --> <AttributeSchema name="iplanet-am-auth-sampleauth-auth-level" resourceName="authLevel" type="single" syntax="number_range" rangeStart="0" rangeEnd="2147483647" i18nKey="a500"> <DefaultValues> <Value>1</Value> </DefaultValues> </AttributeSchema> <!-- No need for resourceName when the name is JSON-compatible --> <AttributeSchema name="specificAttribute" type="single" syntax="string" validator="no" i18nKey="a501" /> <AttributeSchema name="sampleauth-service-valid-username" type="single" syntax="string" validator="no" i18nKey="a502" /> <AttributeSchema name="sampleauth-service-valid-password" type="single" syntax="string" validator="no" i18nKey="a503" /> <!-- For Auth Modules, the parent Schema element specifies the REST SMS resourceName, and the nested SubSchema must have resourceName="USE-PARENT" --> <SubSchema name="serverconfig" inheritance="multiple" resourceName="USE-PARENT"> <AttributeSchema name="iplanet-am-auth-sampleauth-auth-level" resourceName="authLevel" type="single" syntax="number_range" rangeStart="0" rangeEnd="2147483647" i18nKey="a500"> <DefaultValues> <Value>1</Value> </DefaultValues> </AttributeSchema> <!-- No need for a DefaultValues element when the default is blank --> <AttributeSchema name="specificAttribute" type="single" syntax="string" validator="no" i18nKey="a501" /> <AttributeSchema name="sampleauth-service-valid-username" type="single" syntax="string" validator="no" i18nKey="a502" /> <AttributeSchema name="sampleauth-service-valid-password" type="single" syntax="string" validator="no" i18nKey="a503" /> </SubSchema> </Organization> </Schema> </Service> </ServicesConfiguration> |
4-6. src/main/resources/config/auth/default/openam/services/sample/SampleAuth.xml
ログイン画面のUI表示に使用するxmlファイルです。
通常はsrc/main/resources/config/auth/default/SampleAuth.xmlとして作成しますが、
今回はsampleというrealmで作成しますので、
こちらに従い、
src/main/resources/config/auth/default/openam/services/sample/SampleAuth.xml として作成します。
内容はこちらと同内容で作成します。
ここまで用意できればビルドを行います。
|
1 |
# mvn install |
targetの下に、sample-auth-module-1.0.0.jarが作成されますので、
OpenAMが配備されたディレクトリのWEB-INF/lib配下にコピーします。
|
1 |
# cp target/sample-auth-module-1.0.0.jar /usr/local/tomcat/webapps/login/WEB-INF/lib/ |
5. 独自認証モジュールをOpenAMに登録
作成した認証モジュールをOpenAMに登録するために、
ssoadmというツールをインストールする必要があります。
最初にダウンロードしたOpenAM-13.0.0.zipの中の、
SSOAdminTools-13.0.0.zipがssoadmです。
これをOpenAMサーバにアップロードして、
下記コマンドでインストールします。
|
1 2 3 4 5 6 7 8 9 10 11 12 13 14 |
# mkdir -p /usr/local/ssoadmintools # cd /usr/local/ssoadmintools # unzip /path/to/SSOAdminTools-13.0.0.zip # ./setup Do you accept the license? y OpenAM サーバーの設定ファイルのパス [/root/openam]:/usr/local/openam デバッグディレクトリ [/usr/local/ssoadmintools/debug]: ログディレクトリ [/usr/local/ssoadmintools/log]: スクリプトは次のディレクトリに正しく設定されています: /usr/local/ssoadmintools/login デバッグディレクトリは /usr/local/ssoadmintools/debug です。 ログディレクトリは /usr/local/ssoadmintools/log です。 この tools.zip のバージョン: OpenAM 13.0.0 サーバーインスタンスのバージョン: OpenAM 13.0.0 Build 5d4589530d (2016-January-14 21:15) |
インストールしたssoadmで作成した認証モジュールをOpenAMに登録します。
|
1 2 3 4 5 |
# echo [amAdminユーザのパスワード。ここではopenam01] > /tmp/password.txt # chmod 400 /tmp/password.txt # cd /usr/local/ssoadmintools/login/bin # ./ssoadm create-svc --adminid amAdmin --password-file /tmp/password.txt --xmlfile path/to/amAuthSampleAuth.xml # ./ssoadm register-auth-module --adminid amAdmin --password-file /tmp/password.txt --authmodule com.example.openam.SampleAuth |
登録完了後、Tomcatを再起動してください。
6. OpenAMの設定
http://openam-test.example:8080/loginにアクセスして、
amAdminユーザでログインします。
まず、認証を行うレルム(一連の認証設定を管理する単位)を作成していきます。
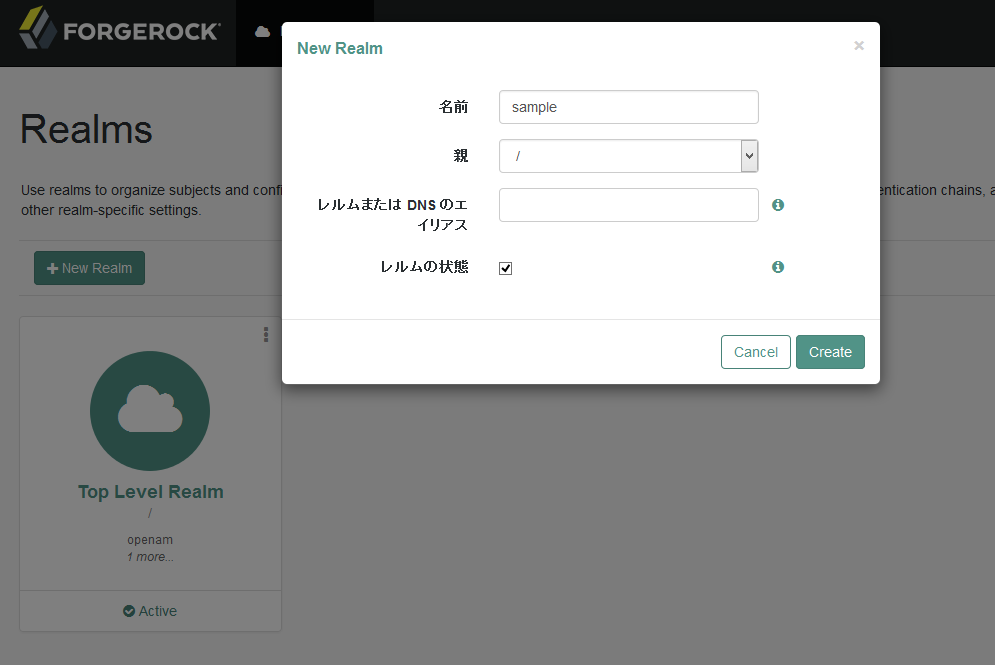
ログインすると、OpenAMに作成されたレルム一覧が表示されます。
初期状態ではTop Level Realmが登録されています。
「New Realm」ボタンをクリックすると、
レルムの新規登録画面が表示されますので、
先ほど登録した認証モジュールはレルム名をsampleとして使う想定でしたので、
レルム名をsampleとして登録します。
6-1. sampleレルムの認証設定
sampleレルムに対して認証設定を行っていきます。
sampleレルムをAuthentication > Settingsを選択します。
まず、ユーザプロファイルタブで、
「ユーザプロファイル」を「必須」→「動的」に変更します。
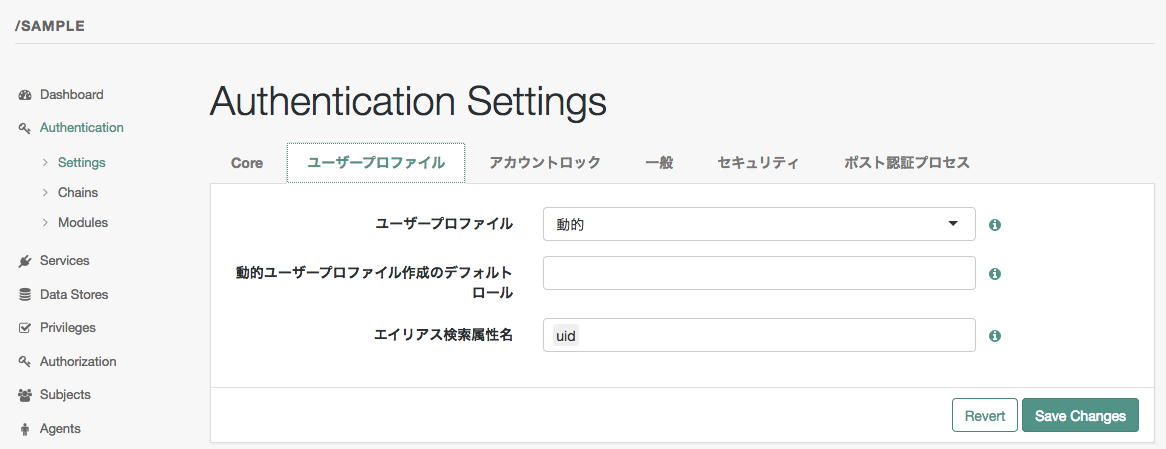
OpenAMの認証フローでは、
認証後に「ユーザがOpenAMが管理するユーザデータストアに存在しているか」を必ずチェックして、存在しない場合はログイン画面にリダイレクトされてしまいます。(詳しくはこちらを参照ください。)
ID/パスワードを予めOpenAMの管理するユーザデータストアに登録しておく必要があるのですが、
上記の設定を施すことで、認証後に該当のユーザがOpenAMが管理するデータストアに存在しない場合、
OpenAMの方でユーザを作成してくれますので、認証成功したにもかかわらずログイン画面にリダイレクトされるようなことはなくなります。
外部サーバとやりとりして認証を行なうようなモジュールの場合は、ID/パスワードの事前の同期が不要になりますので、この設定が使えるのではないかと考えます。
次にセキュリティタブで、
モジュールベースの認証を無効化します。
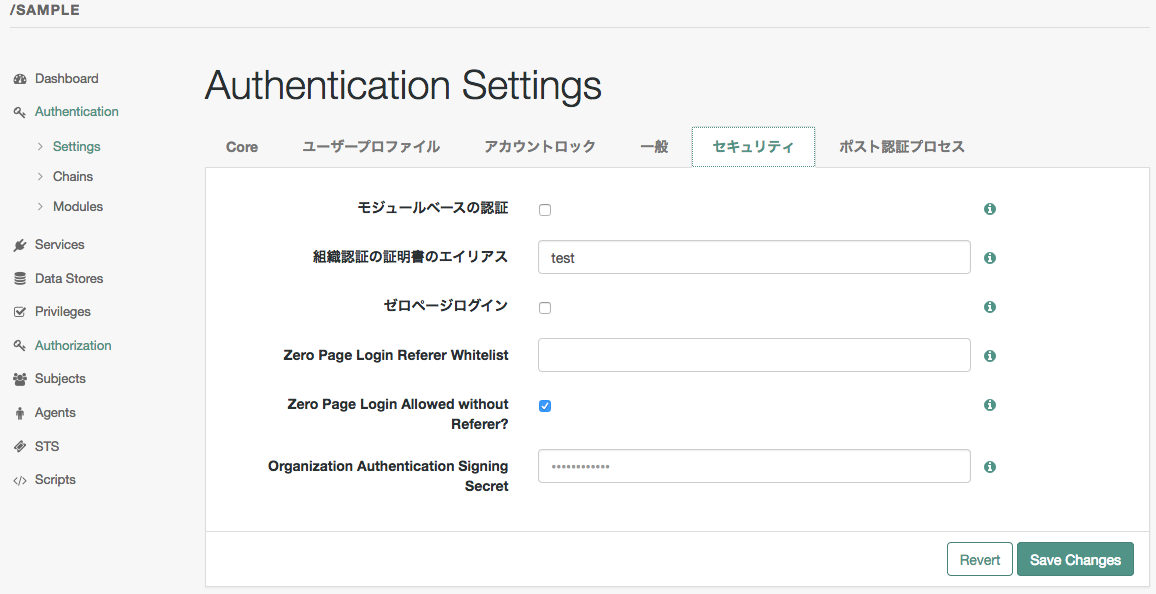
ポスト認証プロセスタブで、ログイン成功時に返すデフォルトの URL を「/sample/?realm=sample」に変更します。
「?realm=sample」というパラメータは、
sampleレルムに設定した認証設定でログインします、またはしたよ、という意味です。
また、ユーザーID生成モードのチェックを外します。
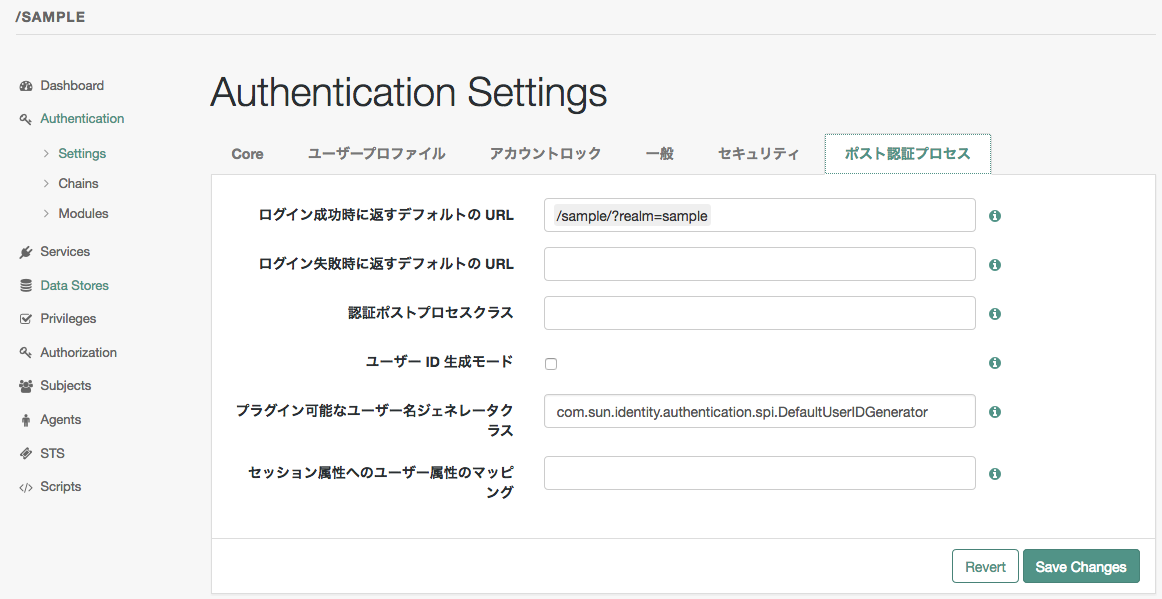
次にAuthentication > Modulesから、自作した認証モジュールを追加します。
「Add Module」をクリックすると、モジュール追加画面が表示されます。
Module Nameに「SampleAuthModule」を入力、
Typeのプルダウンに先ほど作成したモジュールが「サンプル認証モジュール」として選択可能となっていますので、
それを選択します。

モジュールを追加すると、そのモジュールの設定画面に進みます。
amAuthSampleAuth.xmlで定義した設定項目が表示されます。
今回はログインユーザ名、ログインパスワードを設定できるようにしましたので、
それぞれSynergy、changeitに設定します。
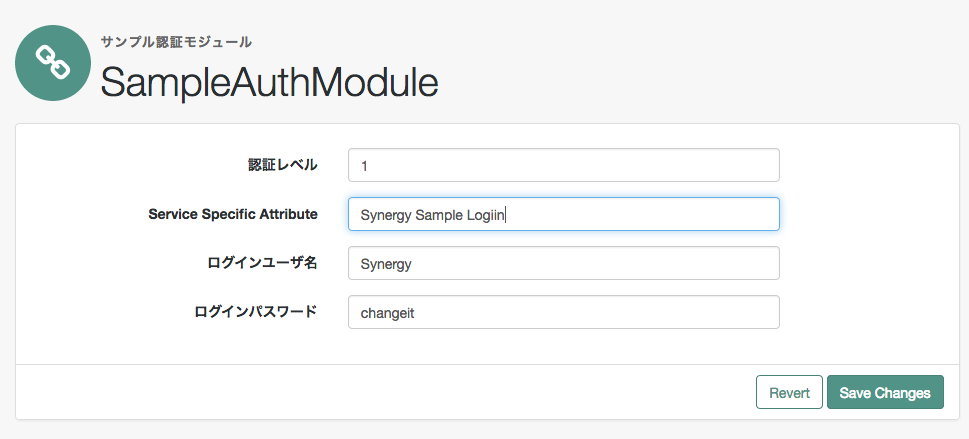
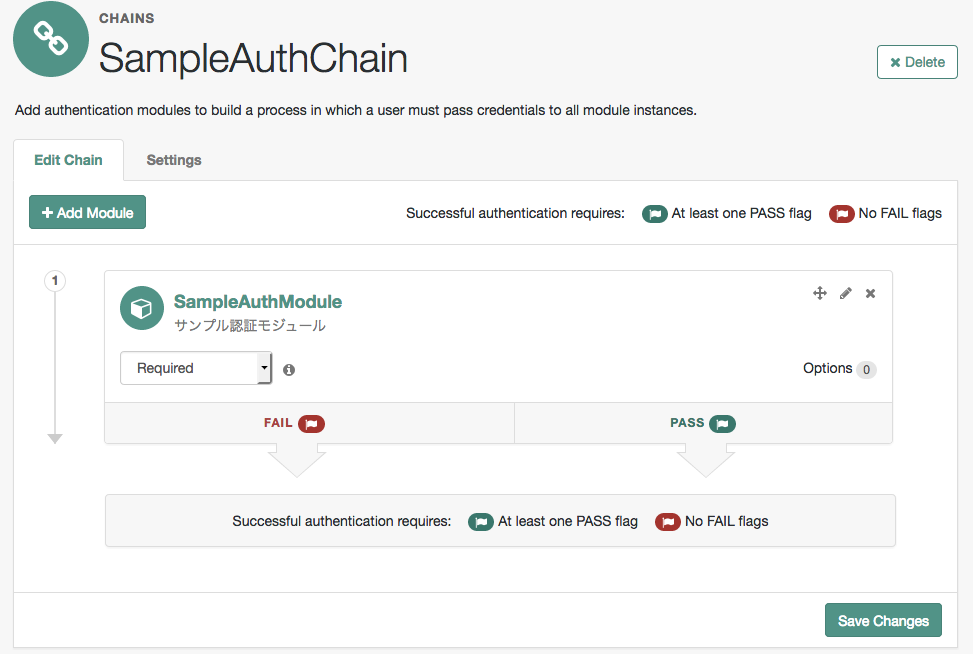
次に、追加した認証モジュールを必須とする新規認証連鎖を作成します。
Authentication > Chains > 「Add Chain」をクリックすると、新規認証連鎖登録画面が表示されます。
Chain Nameは「SampleAuthChain」とします。
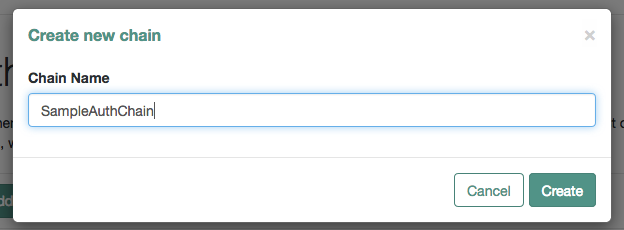
作成した認証連鎖にモジュールを追加します。
「SampleAuthModule」を選択し、条件は「Required」とします。
ログイン後に返すURLに「http://openam-test.example.com/sample/?realm=sample」を設定します。
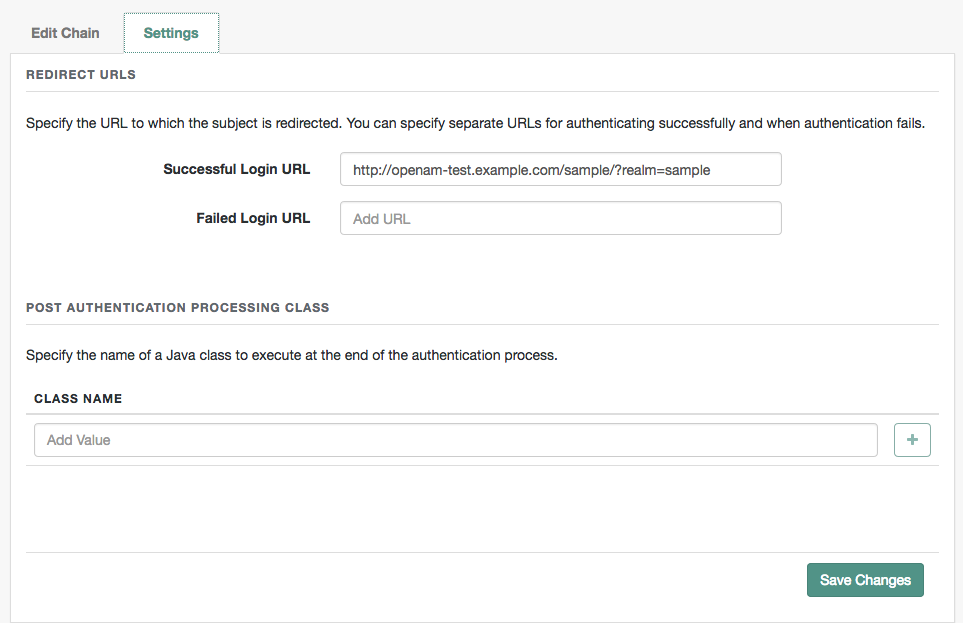
次にさっき追加した認証連鎖を認証で使用するように設定します。
Authentication > Settings > Coreタブを選択し、
管理者認証設定、組織認証設定ともに「SampleAuthChain」を選択します。
6-2. sampleレルムのエージェントの設定
次に「エージェント」の設定を行ないます。
Policy Agentにどのような振る舞いを行わせるかの設定をしていきます。
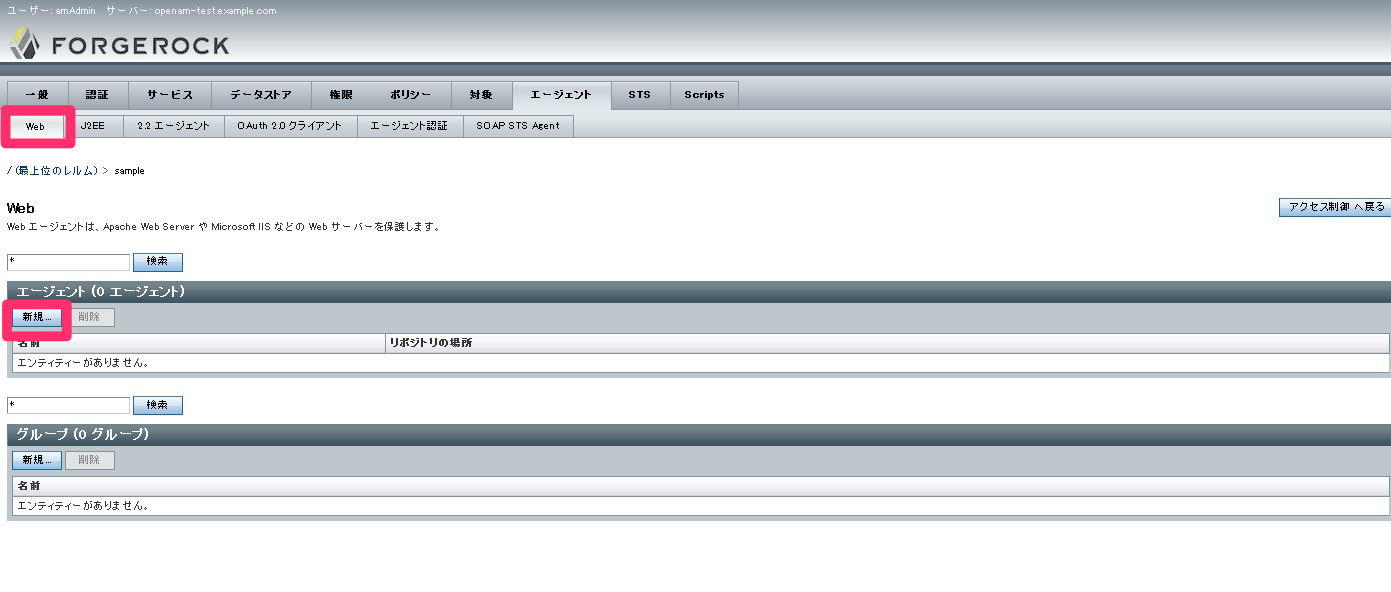
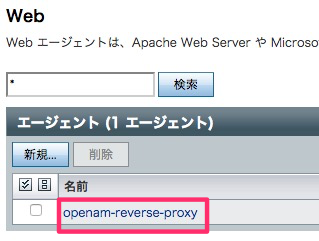
sampleレルム > Agents をクリックすると、下記画面が表示されます。
今回はApacheにPolicy Agentを組み込みますので、
Webタブを選択して、エージェントの新規ボタンをクリックします。
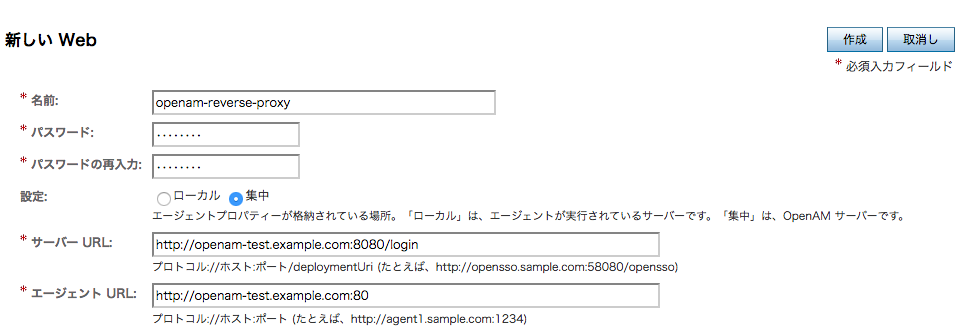
エージェント新規登録画面で、下記内容を入力して登録します。
- 名前:openam-reverse-proxy
- パスワード:openam02
- サーバー URL:http://openam-test.example.com:8080/login
- エージェント URL:http://openam-test.example.com:80
作成したエージェントを選択して詳細設定を行っていきます。
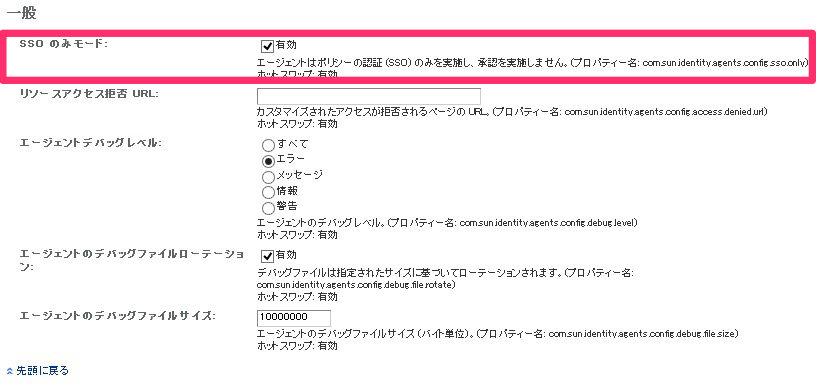
■ グローバルタブ
「SSOのみモード」の「有効」にチェックを入れます。
「SSOのみモード」というのは、Policy Agentで認証のみを行ない認可は行わない、という意味です。
どのユーザがどのリソースにアクセスできるかを制御しません。
(認可を行なう場合はポリシーの設定が必要となります。設定方法はこちらをご覧ください。)
■ アプリケーションタブ
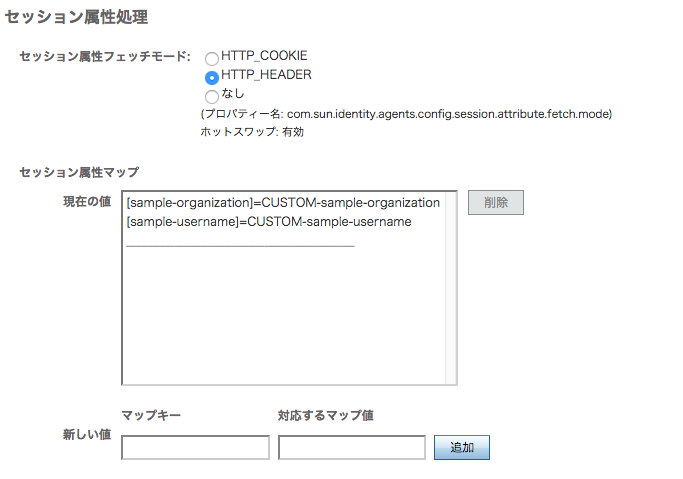
OpenAMのセッションで管理している情報を、SSO対象アプリケーションに対するリクエストのHTTPヘッダにPolicy Agentが付与する設定をします。
セッション属性フェッチモードは「HTTP HEADER」を選択し、
セッション属性マップの設定箇所で下記内容を設定します。
左側がセッションで管理しているキー、右側がHTTPヘッダに付与するキーです。
- [sample-username]=CUSTOM-sample-username
- [sample-organization]=CUSTOM-sample-organization
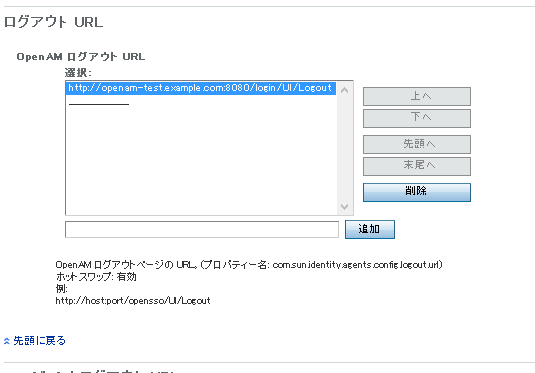
■ OpenAMサービスタブ
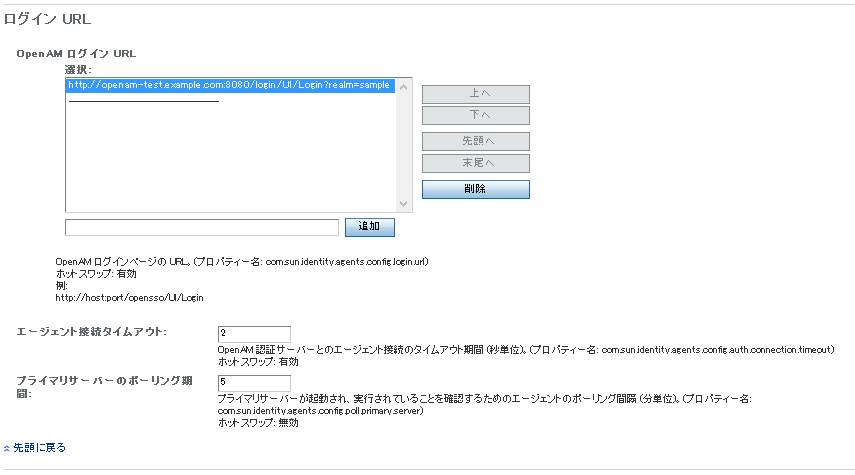
ログインのURLに「?realm=sample」を付与します。
ログアウトのURLにも「?realm=sample」を付与します。
7. Policy Agentのインストール
Apacheに組み込むPolicy Agentをこちらからダウンロードします。
ダウンロードするためには、forgerock社へのアカウント登録・サインインが必要です。
無償ダウンロードできる最新のPolicy Agentのバージョンが4.0.0ですが、
セッション属性をHTTPヘッダにセットしてくれない不具合があるようなので、
今回はバージョン3.3.0(Apache-v2.4-Linux-64-Agent-3.3.0.zip)をダウンロードしました。
今回はリバースプロキシ方式ですので、OpenAMサーバのApache 2.4にPolicy Agentを組み込みます。
(エージェント方式であれば、SSO対象アプリケーションサーバ側にPolicy Agentを組み込む形となります。)
Apacheがインストールされていない場合は、yumでインストールします。
|
1 |
yum install httpd |
ダウンロードしたPolicy Agentを解凍します。
|
1 2 |
# cd /etc/httpd # unzip /path/to/Apache_v24_Linux_64bit_4.0.0.zip |
インストール前にApacheを停止しておきます。
|
1 |
# systemctl stop httpd |
それではPolicy Agentをインストールしていきます。
|
1 2 3 4 5 6 7 8 9 10 11 12 13 14 15 16 17 18 19 20 21 22 23 24 25 26 27 28 29 30 31 32 33 34 35 36 37 38 39 40 41 42 43 44 45 46 47 48 49 50 51 52 53 54 55 56 57 58 59 60 61 62 63 64 65 66 67 68 69 70 71 |
# cd web_agents/apache24_agent/bin # echo [エージェントプロファイル作成時のパスワード。ここではopenam02] > password.txt # chmod 400 password.txt # ./agentadmin --install [Press <Enter> to continue...] or [Enter n To Finish] →Enterキー押下 (ライセンスが表示されるので、Enterかnで読み進める) Agreement (yes/no): [no]: yes ←入力 Enter the complete path to the directory which is used by Apache Server to store its configuration Files. This directory uniquely identifies the Apache Server instance that is secured by this Agent. [ ? : Help, ! : Exit ] Enter the Apache Server Config Directory Path [/opt/apache24/conf]: /etc/httpd/conf Enter the URL where the OpenAM server is running. Please include the deployment URI also as shown below: (http://openam.sample.com:58080/openam) [ ? : Help, < : Back, ! : Exit ] OpenAM server URL: http://openam-test.example.com:8080/login Enter the Agent URL as shown below: (http://agent1.sample.com:1234) [ ? : Help, < : Back, ! : Exit ] Agent URL: http://openam-test.example.com:80 Enter the Agent profile name [ ? : Help, < : Back, ! : Exit ] Enter the Agent Profile name: openam-reverse-proxy(先にOpenAMの管理画面で作成したエージェントプロファイル名を入力) Enter the path to a file that contains the password to be used for identifying the Agent. [ ? : Help, < : Back, ! : Exit ] Enter the path to the password file: /etc/httpd/web_agents/apache24_agent/bin/password.txt ----------------------------------------------- SUMMARY OF YOUR RESPONSES ----------------------------------------------- Apache Server Config Directory : /etc/httpd/conf OpenAM server URL : http://openam-test.example.com:8080/login Agent URL : http://openam-test.example.com:80 Agent Profile name : openam-reverse-proxy Agent Profile Password file name : /etc/httpd/web_agents/apache24_agent/bin/password.txt Verify your settings above and decide from the choices below. 1. Continue with Installation 2. Back to the last interaction 3. Start Over 4. Exit Please make your selection [1]: 1 (中略) SUMMARY OF AGENT INSTALLATION ----------------------------- Agent instance name: Agent_001 Agent Bootstrap file location: /etc/httpd/web_agents/apache24_agent/Agent_001/config/OpenSSOAgentBootstrap.properties Agent Configuration Tag file location /etc/httpd/web_agents/apache24_agent/Agent_001/config/OpenSSOAgentConfiguration.properties Agent Audit directory location: /etc/httpd/web_agents/apache24_agent/Agent_001/logs/audit Agent Debug directory location: /etc/httpd/web_agents/apache24_agent/Agent_001/logs/debug Install log file location: /etc/httpd/web_agents/apache24_agent/installer-logs/audit/install.log Thank you for using OpenAM Policy Agent |
これでPolicy Agentのインストールは完了しましたが、
Policy Agentがデフォルトでトップレベルのレルムを参照する設定になっていますので、
OpenSSOAgentBootstrap.properties(私の環境では/etc/httpd/web_agents/apache24_agent/Agent_001/config/OpenSSOAgentBootstrap.properties)の下記の行を編集して、
作成したsampleというレルムを参照するように変更します。
|
1 |
com.sun.identity.agents.config.organization.name = sample |
8. リバースプロキシ設定
SSO対象のアプリケーションへのリバースプロキシの設定を行います。
OpenAMサーバのhttpd.confに以下の設定を追加します。
|
1 2 3 4 5 |
<Location "/sample"> ProxyPass http://[sso対象アプリケーションのサーバIPもしくはFQDN]/ ProxyPassReverse http://[sso対象アプリケーションのサーバIPもしくはFQDN]/ ProxyPassReverseCookiePath / /sample </Location> |
※ SSO対象のアプリケーションを増やす場合は、上記のLocationの設定を追加します。
ここまで完了したら、OpenAMサーバのApacheを起動します。
|
1 |
systemctl start http |
動作確認
実際に動作確認してみます。
まず、HTTPヘッダの内容を出力するPHPファイルを作成します。
下記内容をSSO対象アプリケーションサーバ側のApacheのドキュメントルートにindex.phpとして保存します。
|
1 2 3 4 5 6 |
<?php echo "【HTTP Header List】<br>"; foreach (getallheaders() as $key => $value) { echo "$key: $value<br>"; } ?> |
では、ブラウザからhttp://openam-test.example.com/sampleにアクセスします。
Policy Agentがリクエストを検知して、OpenAMに認証されているかどうかチェックし、
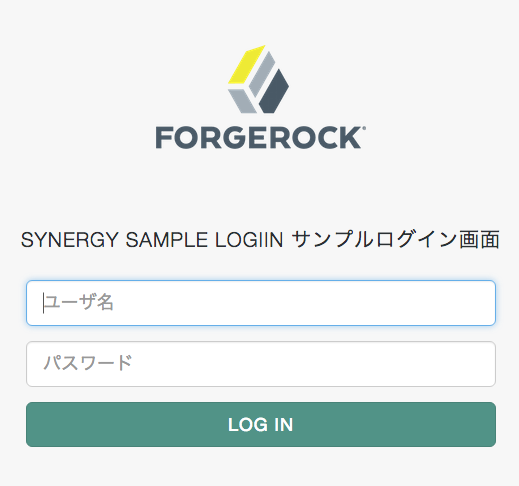
認証されていないため、OpenAMのログインページにリダイレクトされます。
※上記のログイン画面のデザインはカスタマイズ可能です。方法はこちらを参照ください。
OpenAMの設定画面で設定したログインユーザ名とログインパスワードを入力してログインすると、
OpenAMによって認証後、リバースプロキシ先のSSO対象アプリケーションにリダイレクトされます。
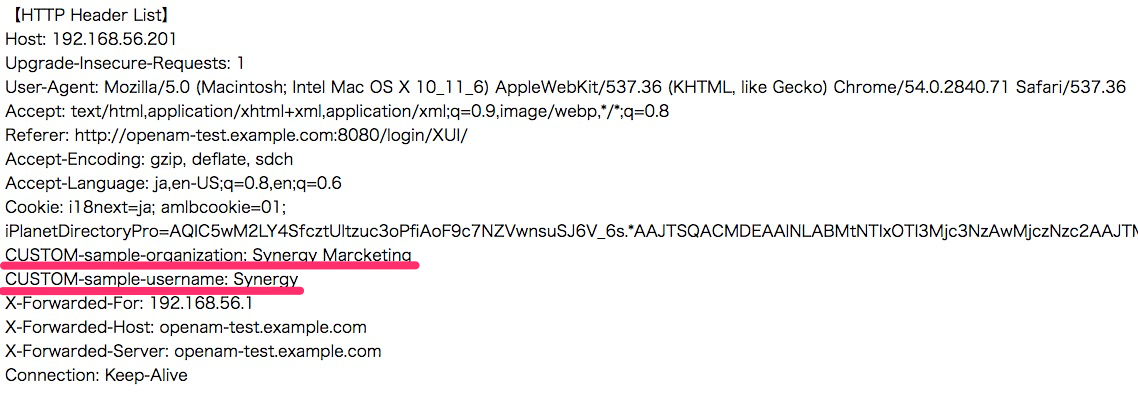
HTTPヘッダの一覧が出力されており、
CUSTOM-sample-usernameとCUSTOM-sample-organizationがPolicy Agentによって付与されていることが分かります。
iPlanetDirectoryPro=xxxxというのが認証Cookieキーで、
Policy Agentはこれの有無をチェックし、有ればOpenAMに問い合わせして有効な値であるかどうかをチェックしているようです。
終わりに
長文となってしまいましたが、最後までお読みいただきありがとうございました。
OpenAMでリバースプロキシ方式のSSOを実現するための手順をざっと紹介させていただきましたが、
OpenAMは、リバースプロキシ方式以外にもSAML(Security Assertion Markup Language)やOpenID Connectに対応しており、また要件に合わせたカスタマイズも可能です。
個人的には時間があればOpenID Connectの設定も試してみたいなと思っています。


